One of the biggest mysteries of the bassoon is how to deal with bassoon reeds. In essence the reed actually represents the entire ‘mouthpiece’ of the instrument so their importance should not be estimated.

The bassoon uses a double reed, meaning two pieces of cane are attached together. These pieces of cane vibrate when air is blown through the lips, which produces the noise to play the bassoon.
Basson reeds usually come in several strengths – soft, medium soft, medium, medium hard and hard. The sober the reed the easier it is to play. If you are just starting or are relatively new to the bassoon, it is advisable that you initially use student bassoon reeds which are free blowing, easy and cheap.
Before you start
Before playing your reed it is best to soak it in water as opposed to wetting it in your mouth with saliva. Moistening helps the reed vibrate better and it also prevents cracking. A quick dip is all you need.
New reeds need to go through a ‘blowing in period’. Your reeds will last longer and sound better if you ‘blow them in’.
On the first day, play a reed for a maximum of 10 minutes then leave it out to dry off in the air. Allow your reed to dry out completely between sessions. Gradually increase the daily playing time up to one hour over the next 1 – 2 weeks. During this ‘blowing in’ period, the reed will start to feel more resistant but try to avoid making any adjustments at this stage. Remember to alternated between different reeds. After many hours of playing, this resistance will begin to decrease again, indicating the the reed is now ‘blown in’ and will remain stable for a long time.
Reed adjustments – for more advanced players
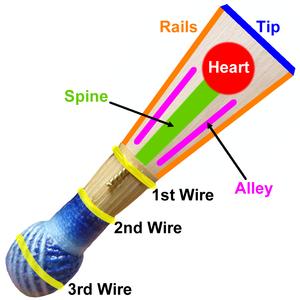
Once your reed is blown in start listening to the ‘crow’ of the reed. To crow take the moistened reed into the mouth up to the first wire and, with a loose embouchure, blow the reed. The reed should make a crowing sound and will indicate how freely it will blow. If the reed only makes a very high pitch, it may be too closed at the tip or it could be too hard. The reed may crow with a very rough low rattle and this could mean that the reed is too open at the tip of is too soft. There are several easy (reversible!) adjustments you can make to fix this and several other problems you may find.
The 1st Wire – Making the wore rounder by squeezing the sides of the reed where the wire is will;
• pen the tip off the reed
• Make the reed flatter in pitch
• Make the reed more resistant
The 1st wire – Making the wire more oval by squeezing the top & bottom of the reed, where is wire is, will;
• Close the tip pf the reed
• Make the reed sharper
• Make the reed more responsive
The second wire – Making the wire rounder by squeezing the sides of the reed, where the wire is, will;
• Close the tip of the reed
• make the high notes stronger
• Make the reed sharper in pitch
• Mellows the sound of the reed
• improves stability on E and C# (below middle C)
• Makes the reed more resistant
The 2nd wire – Making the wire more oval by squeezing the top and bottom of the reed, where the wire is;
• Open the tip pf the reed
• Make the reed flatter in pitch
• Increase response and freeness of the reed
• Creates and brighter sound
• Increases projection
• Makes low notes easier.
One more tip from clarinettist Paul Globus – “Rinse you mouth before playing. The cleaner your mouth is the cleaner your reeds will be and the longer they will last. I would like to say that this is just common sense but when it comes to hygiene – even with respect to keeping one’s local and instrument clean – this point is anything by common. I dare say, it’s commonly overlooked entirely.”
Compiled by Tanya Campbell from the following website – Musson Bassoon Reeds , Tim Price Jazz & Crook and Staple.


